包括单域名和泛域名通配符。
环境介绍
centOS6系列
git version 1.7.1(自带默认的)
Python 2.6.6(自带默认的)
let’s encrypt最新版V2接口(2020-05-08)
文档更新说明 无
方式一:acme.sh 1 2 3 4 5 6 7 主要步骤:(引自官网) 1.安装 acme.sh 2.生成证书 3.copy 证书到 nginx/apache 或者其他服务 4.更新证书 5.更新 acme.sh 6.出错怎么办, 如何调试
1. 安装 acme.sh 1 2 3 yum update yum install curl -y yum install cron -y
安装很简单, 一个命令:
1 2 3 4 curl https://get.acme.sh | sh 或者(推荐) yum update wget wget -O - https://get.acme.sh | sh
如果报错curl: (35) SSL connect error,移步:https://janeyork.blog.csdn.net/article/details/82700159
如果报错curl: (7) couldn't connect to host出站端口dport 443、80添加了或者防火墙关闭。
1 2 3 4 5 6 7 8 9 10 11 12 13 14 15 16 17 # Firewall configuration written by system-config-firewall # Manual customization of this file is not recommended. *filter :INPUT ACCEPT [0:0] :FORWARD ACCEPT [0:0] :OUTPUT ACCEPT [0:0] -A INPUT -m state --state ESTABLISHED,RELATED -j ACCEPT -A INPUT -p icmp -j ACCEPT -A INPUT -i lo -j ACCEPT -A INPUT -m state --state NEW -m tcp -p tcp --dport 22000 -j ACCEPT -A INPUT -m state --state NEW -m tcp -p tcp --dport 22 -j ACCEPT -A INPUT -m state --state NEW -m tcp -p tcp --dport 80 -j ACCEPT -A INPUT -m state --state NEW -m tcp -p tcp --dport 443 -j ACCEPT -A INPUT -j REJECT --reject-with icmp-host-prohibited -A FORWARD -j REJECT --reject-with icmp-host-prohibited COMMIT
普通用户和 root 用户都可以安装使用. 安装过程进行了以下几步:
把 acme.sh 安装到你的 home 目录下:
1 ~/.acme.sh/ (这个是自动执行的安装目录)
并创建 一个 bash 的 alias, 方便你的使用: alias acme.sh=~/.acme.sh/acme.sh这个是自动操作,如果没有请手动。
出现install success即为成功。
自动为你创建了cronjob。
关闭shell重新打开。或者让命令立即生效source ~/.bashrc
验证方式一:DNS手动验证。(个人推荐)
https://github.com/acmesh-official/acme.sh
1 2 acme.sh --issue -d example.com -d *.example.com --dns \ --yes-I-know-dns-manual-mode-enough-go-ahead-please
验证TXT解析是否生效
1 dig -t txt _acme-challenge.xxoo.com @8.8.8.8
添加解析生效后,重新生成证书。
1 2 acme.sh --renew -d xxoo.com -d *.xxoo.com \ --yes-I-know-dns-manual-mode-enough-go-ahead-please
注意:
手动模式无法自动更新(就看中了这点,如果你想自动更新可以自己写定时脚本)
证书有效期60天,需要手动解析、申请、复制、修改
DNS API自动续期60天内,可调整时间
DNS手动续期,需要在90天内
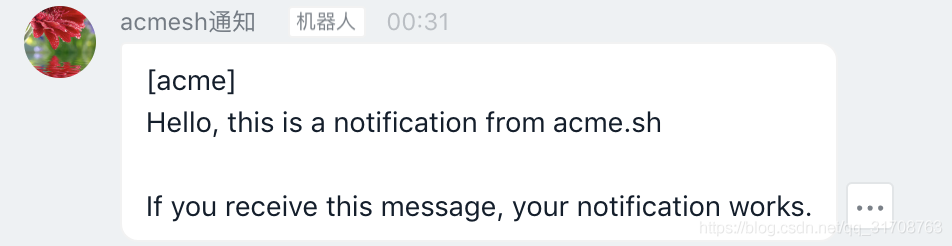
设置钉钉通知 1 2 3 export DINGTALK_WEBHOOK='https://oapi.dingtalk.com/robot/send?access_token=5241080f1e14f0d8af2fa6cef175934f0d9d636' export DINGTALK_KEYWORD=acme
1 2 3 acme.sh --set-notify --notify-hook dingtalk \ --notify-level 2 \ --notify-mode 0
DNS API自动续期,个人使用 1 2 3 4 5 6 7 8 $ export Ali_Key="woshipogaizai" $ export Ali_Secret="nishipogaizaima" 这两个配置将永久保存在文件~/.acme.sh/account.conf中 # 申请 acme.sh --issue --dns dns_ali -d xxoo.com -d *.xxoo.com # DP # acme.sh --issue --dns dns_dp -d mydomain.com -d *.mydomain.com 证书申请成功后,保存在~/.acme.sh/www.example.com目录下
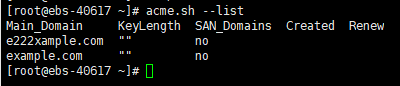
查看证书
删除证书
方式2、HTTP文件验证:
1 $ acme.sh --issue -d congm.in -d *.congm.in -w /home/webroot
注意:对于通配符证书需要加 -d 域名 -d *.域名 两个参数-w 即webroot,为该 域名 通过http所访问到的本地目录上面这段过程将会在 /home/webroot 创建一个 .well-known 的文件夹,同时 Let’s Encrypt 将会通过你要注册的域名去访问那个文件来确定权限,它可能会去访问 http://xxoo.in/.well-known/ 这个路径,验证成功会自动清理。
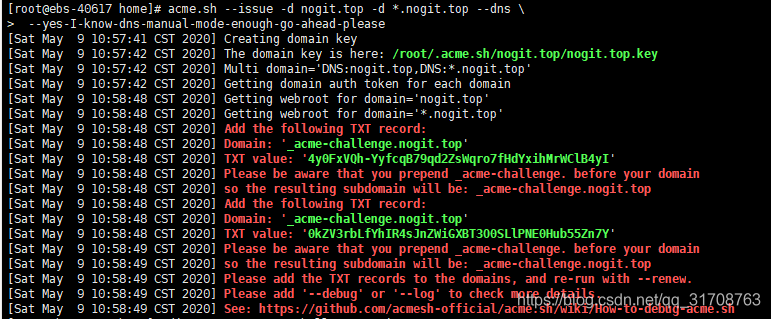
DNS手动验证实践及截图 1 2 acme.sh --issue -d pusdn.com -d *.pusdn.com --dns \ --yes-I-know-dns-manual-mode-enough-go-ahead-please
验证TXT解析是否生效
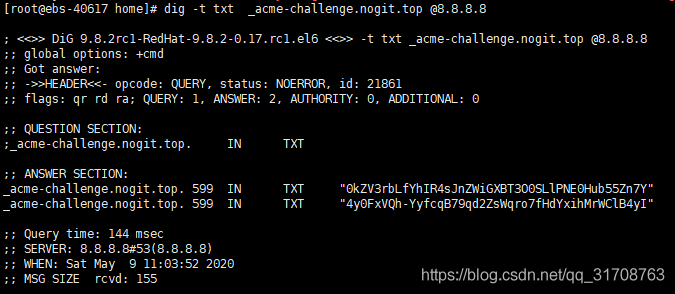
1 dig -t txt _acme-challenge.pusdn.com @8.8.8.8
添加解析生效后,重新生成证书。中间可能等待一小会儿
1 2 acme.sh --renew -d pusdn.com -d *.pusdn.com \ --yes-I-know-dns-manual-mode-enough-go-ahead-please
执行过程截图:
生成结果:
1 2 3 4 5 6 7 8 9 10 11 12 13 14 15 16 17 18 19 20 21 22 23 24 25 26 27 28 29 30 31 32 33 34 35 36 [root@ebs-40617 home]# acme.sh --renew -d pusdn.com -d *.pusdn.com \ > --yes-I-know-dns-manual-mode-enough-go-ahead-please [Sat May 9 11:04:33 CST 2020] Renew: 'pusdn.com' [Sat May 9 11:04:38 CST 2020] Multi domain='DNS:pusdn.com,DNS:*.pusdn.com' [Sat May 9 11:04:38 CST 2020] Getting domain auth token for each domain [Sat May 9 11:04:38 CST 2020] Verifying: pusdn.com [Sat May 9 11:04:52 CST 2020] Pending [Sat May 9 11:04:59 CST 2020] Pending [Sat May 9 11:05:11 CST 2020] Success [Sat May 9 11:05:11 CST 2020] Verifying: *.pusdn.com [Sat May 9 11:05:27 CST 2020] Pending [Sat May 9 11:05:32 CST 2020] Pending [Sat May 9 11:05:52 CST 2020] Success [Sat May 9 11:05:52 CST 2020] Verify finished, start to sign. [Sat May 9 11:05:52 CST 2020] Lets finalize the order, Le_OrderFinalize: https://acme-v02.api.letsencrypt.org/acme/finalize/85615348/3294031693 [Sat May 9 11:05:59 CST 2020] Download cert, Le_LinkCert: https://acme-v02.api.letsencrypt.org/acme/cert/04b84bbcd3d822e1b6a0dfae29e11a03d08a [Sat May 9 11:06:03 CST 2020] Cert success. -----BEGIN CERTIFICATE----- MIIFVzCCBD+gAwIBAgISBLhLvNPYIuG2oN+uKeEaA9CKMA0GCSqGSIb3DQEBCwUA MEoxCzAJBgNVBAYTAlVTMRYwFAYDVQQKEw1MZXQncyBFbmNyeXB0MSMwIQYDVQQD ExpMZXQncyBFbmNyeXB0IEF1dGhvcml0eSBYMzAeFw0yMDA1MDkwMjA1NTlaFw0y MDA4MDcwMjA1NTlaMBQxEjAQBgNVBAMTCW5vZ2l0LnRvcDCCASIwDQYJKoZIhvcN AQEBBQADggEPADCCAQoCggEBAL7xXjfreYkDKybtLpvSVOgPyciqCLKoD30ziQC4 7JfAD4+tpCu6gkvEE9ViLk7BqSE/uDdip2TSR0OIrREpNl5a/55TpDJMbKXlc8SE asRuTfnPN5JAi9BMCgwJgYIKwYBBQUHAgEWGmh0dHA6Ly9jcHMu bGV0c2VuY3J5cHQub3JnMIIBBAYKKwYBBAHWeQIEAgSB9QSB8gDwAHYAXqdz+d9W wOe1Nkh90EngMnqRmgyEoRIShBh1loFxRVgAAAFx92WLjAAABAMARzBFAiAjwvyx 3kgWcNNeAZxqJ5qjc0gfDAESq613uICtG41pHgIhAIzPzCJVovK6dbz+MyJ3eG6L 5hhdhPdukikP8bOeOkyjAHYAB7dcG+V9aP/x -----END CERTIFICATE----- [Sat May 9 11:06:03 CST 2020] Your cert is in /root/.acme.sh/pusdn.com/pusdn.com.cer [Sat May 9 11:06:03 CST 2020] Your cert key is in /root/.acme.sh/pusdn.com/pusdn.com.key [Sat May 9 11:06:03 CST 2020] The intermediate CA cert is in /root/.acme.sh/pusdn.com/ca.cer [Sat May 9 11:06:03 CST 2020] And the full chain certs is there: /root/.acme.sh/pusdn.com/fullchain.cer [root@ebs-40617 home]#
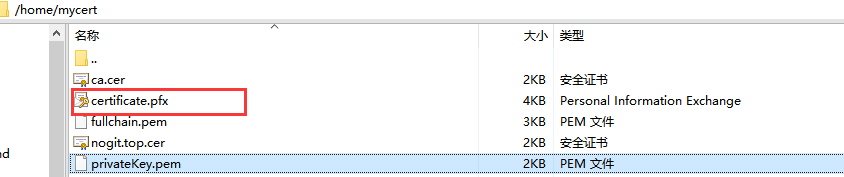
1 2 3 4 5 6 7 8 9 10 11 12 13 14 15 16 17 导出Tomcat pfx格式证书: acme.sh --toPkcs -d pusdn.com --password 1234 导出Nginx: key.pem和pri.key,可以直接更改后缀pem或者key fullchain同理,两者内容一样,可以直接更改后缀 mkdir -p /home/mycert acme.sh --installcert -d pusdn.com \ --key-file /home/mycert/privateKey.pem \ --fullchain-file /home/mycert/fullchain.pem \ --ca-file /home/mycert/ca.cer \ --cert-file /home/mycert/pusdn.com.cer openssl pkcs12 -export -out certificate.pfx -inkey privateKey.pem -in pusdn.com.cer -certfile ca.cer -password "pass:Rookie123" 或者:(两个一样的,只是我把文件名重命名而已) openssl pkcs12 -export -out certificate.pfx -inkey pusdn.com.key -in pusdn.com.cer -certfile ca.cer -password "pass:Rookie123" 第三方网站转换:https://www.sslshopper.com/ssl-converter.html
然后配置到Tomcat里
————————————-杂七杂八 start————————————————–
OpenSSL Convert PEM Convert PEM to DER
1 openssl x509 -outform der -in certificate.pem -out certificate.der
Convert PEM to P7B
1 openssl crl2pkcs7 -nocrl -certfile certificate.cer -out certificate.p7b -certfile CACert.cer
Convert PEM to PFX
1 openssl pkcs12 -export -out certificate.pfx -inkey privateKey.key -in certificate.crt -certfile CACert.crt
OpenSSL Convert DER **Convert DER to PEM
1 openssl x509 -inform der -in certificate.cer -out certificate.pem
OpenSSL Convert P7B Convert P7B to PEM
1 openssl pkcs7 -print_certs -in certificate.p7b -out certificate.cer
Convert P7B to PFX
1 2 openssl pkcs7 -print_certs -in certificate.p7b -out certificate.cer openssl pkcs12 -export -in certificate.cer -inkey privateKey.key -out certificate.pfx -certfile CACert.cer
OpenSSL Convert PFX Convert PFX to PEM
1 openssl pkcs12 -in certificate.pfx -out certificate.cer -nodes
———————————————-杂七杂八 end———————————————-
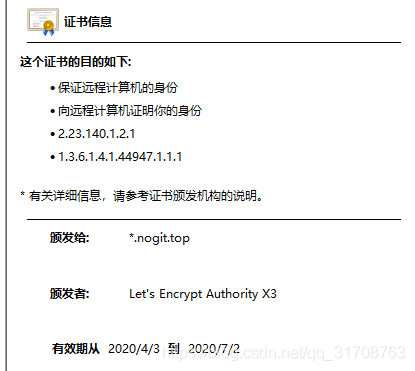
未过期的老证书
现在新证书哦:
未来更新
额外 acme.sh github:https://github.com/acmesh-official/acme.sh
let’s encrypt官网:https://letsencrypt.org/zh-cn/docs/client-options/


 微信
微信 支付宝
支付宝